If you’re serious about stopping power and need room for today’s wider tires, the Odyssey Evo 2.5 U-Brake Kit is a solid solution.
This is a modern remix of the already legendary Evo 2 brake.
Only better.
With more clearance, updated modular hardware, and all-in-one packaging, it’s one of the most complete BMX brake kits on the market.

But does it really work as well as it promises?
Let’s find out.
This review covers:
Odyssey Evo 2.5 U-Brake Kit Review
1. Key Odyssey Evo 2.5 Features That Matter
The Odyssey Evo 2.5 is a full-on refinement aimed at today’s modern BMX setups.
Built for riders running bigger tires and doing big tricks, the updated arm spacing and modular hardware bring new levels of compatibility and confidence to the brake game.
Odyssey Evo 2.5 U-Brake Kit Highlights
- Wider arm spacing to fit modern 2.4″ tires
- Front or rear compatible out of the box (super handy!)
- Forged aluminum arms for high strength without unnecessary cost
- Includes all the must-have hardware, so no hunting down spare parts
- Comes with Odyssey Slim by Four brake pads, Monolever (medium), and Linear Slic Kable
- Modular straddle cable and curved hanger for smoother feel and easier installation
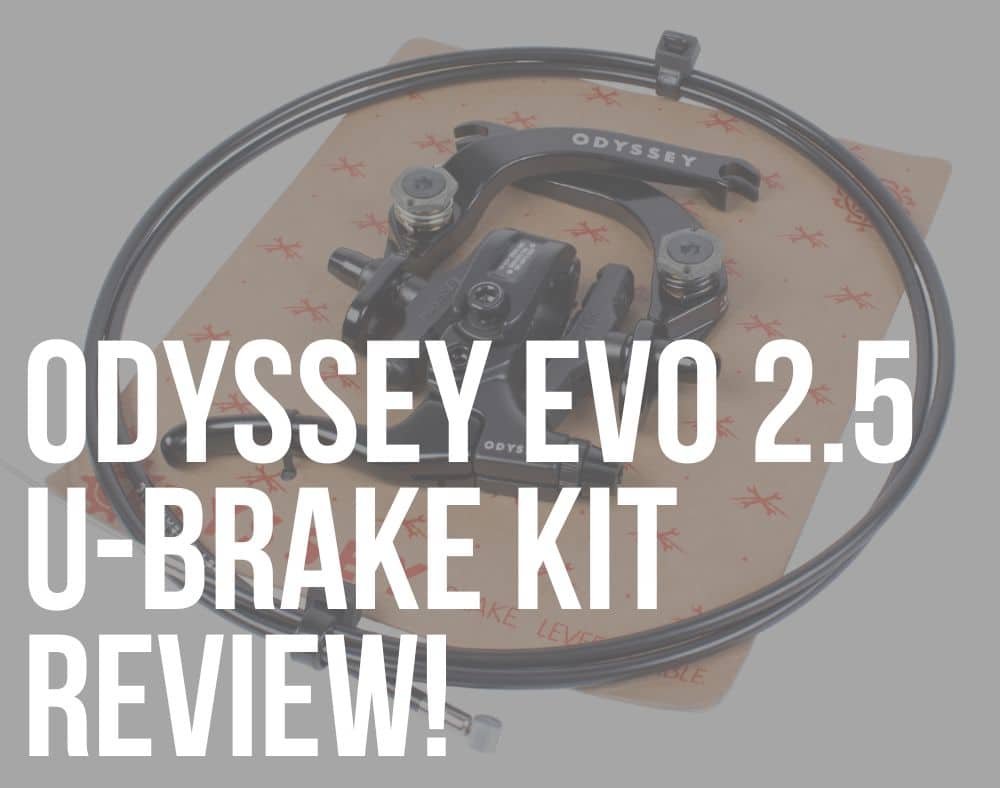
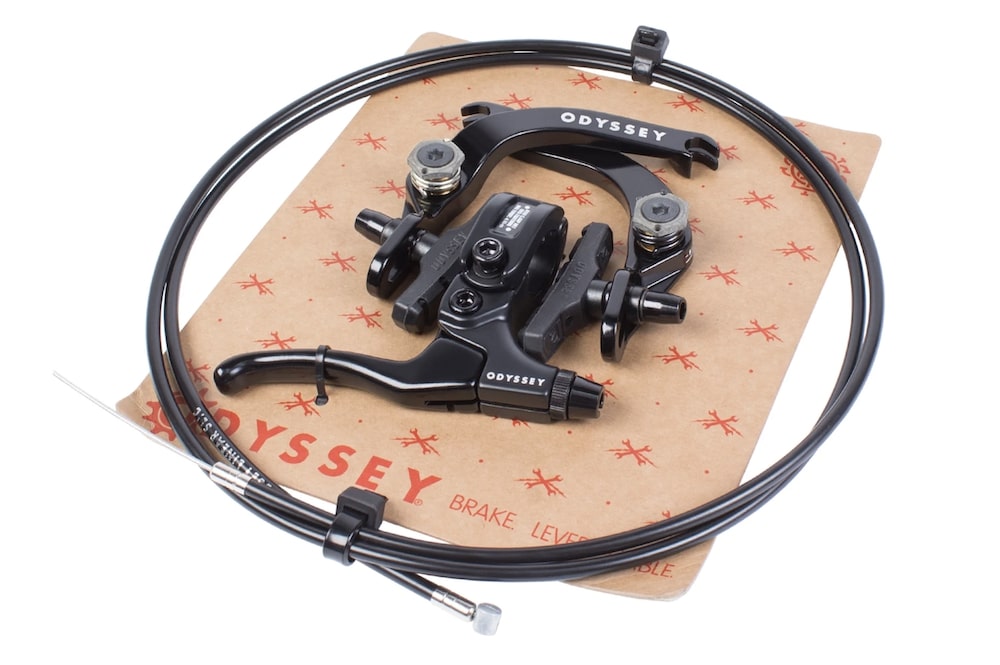
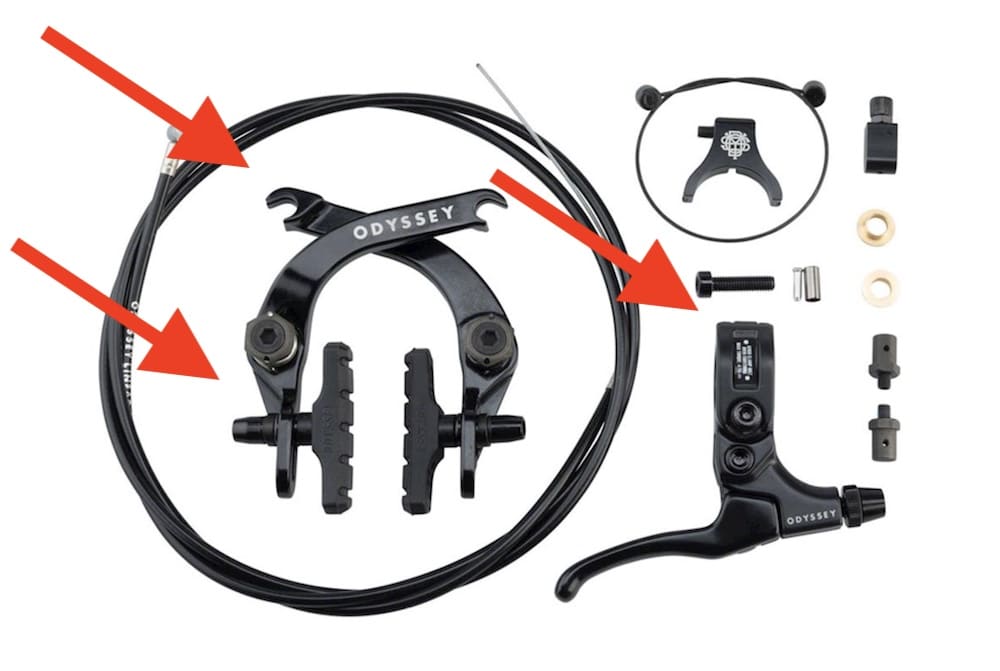
2. What You Get In The Evo 2.5 U-Brake Kit
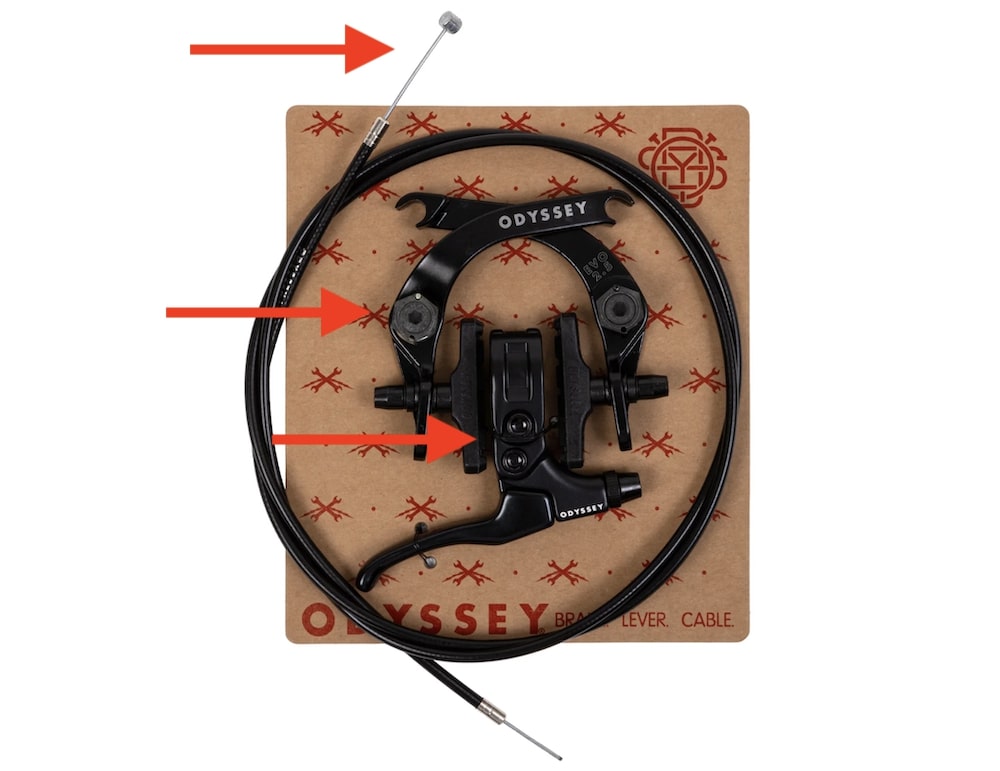
This kit delivers a complete braking system right out of the box, which is especially beneficial for beginners.

No guesswork, no missing parts.
Everything is carefully selected to work perfectly together.
Whether you’re upgrading an old setup or building something fresh, the Evo 2.5 kit equips you with all the tools to stop on a dime with style and confidence.
- Evo 2.5 brake arms (forged aluminum)
- Odyssey Monolever (medium)
- Odyssey linear slic kable (with K-shield)
- Slim by Four brake pads
- Double lugged straddle cable
- Curved cable hanger
- Mounting hardware
Color options include: Black, Toothpaste, Oil Slick, Gold, Polished Silver
Price: $94.99
GET YOUR ODYSSEY EVO BRAKE KIT NOW!3. Evo 2.5 U-Brake Kit’s Ride Performance

This brake delivers strong, predictable stopping power out on the streets or at the park or trails.
The wide clearance keeps your setup clean, even with wider tires and aggressive tread.

The Slim by Four pads bite hard and don’t squeal. And the Monolever feels super dialed with just the right throw.
Setup is straightforward, and once it’s dialed, you’ll forget about it – which is exactly how good brakes should be.
Note: If tolerances are tight, the arms might rub slightly on some frames, but if you’re running a Sunday frame, you should be good to go.
GET YOUR ODYSSEY EVO BRAKE KIT NOW!4. Real Rider Feedback
- Trent B.: “The Evo 2.5 is the only brake I trust for street. Clean look, easy install, and strong stopping with wide tires. Can’t beat it.”
- Luis C.: “I put it on my Sunday Soundwave and it’s flawless. No rubbing, easy pull, and looks clean. The lever and cable are just as good as the brake.”
- Mel G.: “This is the most complete brake kit out there. Pads, lever, cable – it’s all included. Super solid, and I didn’t need to buy anything else.”
- Kade R.: “I’ve run this kit on both my park and street builds. Great feel and reliable. The extra tire clearance is a game changer.”
- Julius H.: “The arms did rub a bit on my older frame, but after a little tweaking, everything was running smoothly. Still the best brake out there for the price.”
5. How To Install Odyssey Evo 2.5 Front & Rear Brakes
Installing the Odyssey Evo 2.5 U-brakes isn’t as complicated as it looks.
However, it just takes a little patience and attention to detail.
Especially for someone installing BMX brakes for the first time.
But don’t you worry – I got you covered!
Below is a simplified step-by-step guide for both the front and rear brake, so you can get everything perfectly dialed without confusion.
Let’s do this.
How To Install The Front Brake
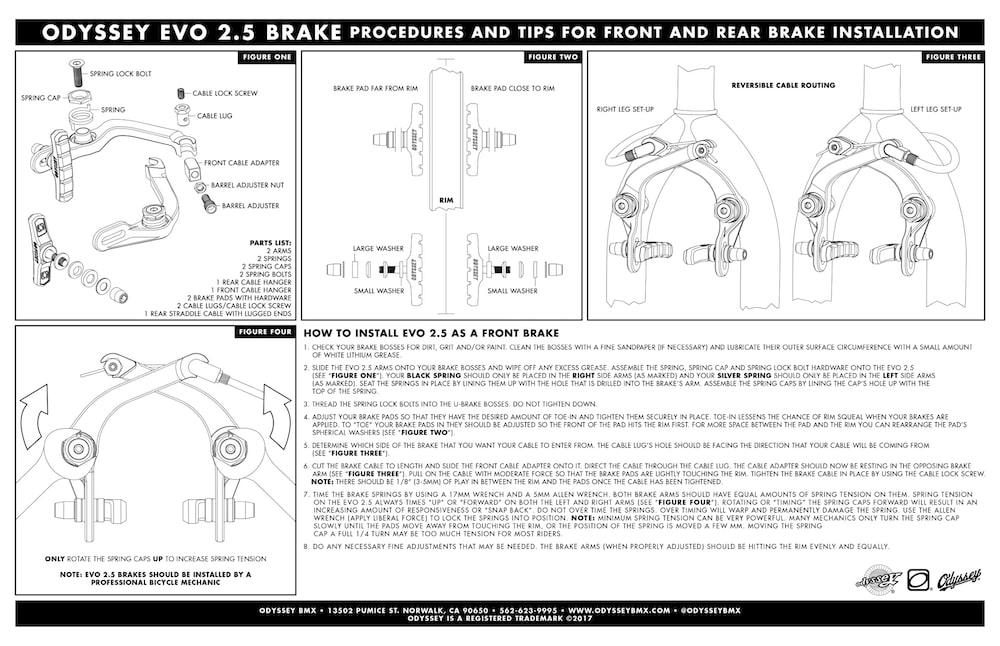
1. Prep your brake mounts
Clean your fork’s brake bosses with a bit of sandpaper or degreaser to remove dirt and paint buildup.
You can even use WD-40 for cleaning.
Then apply a small dab of grease (!) around each boss so the brake arms move smoothly.
2. Mount the brake arms
Slide the two Evo 2.5 arms onto the bosses.
Place the black spring on the right arm and the silver spring on the left arm (each side is marked for user-friendliness).
Line up each spring with the small hole in the frame, and cap it with the spring cap and lock bolt.
Remember not to fully tighten yet!
3. Install the brake pads
Position the pads so the front edge of each pad touches the rim first (“toe-in”).
This reduces brake squeal (one of the more annoying bike sounds – at least for me!) and improves feel.
Tighten the pad bolts once you’re happy with the placement.
4. Route the front brake cable
Feed the brake cable through the front cable adapter on the brake arm.
Make sure the cable runs smoothly without kinks or sharp bends.
Tighten the cable lock screw just enough to hold it in place — you’ll fine-tune things later.
5. Adjust spring tension
Use an Allen key to rotate the spring caps upward to increase tension.
Adjust each side until both arms pull evenly and snap back cleanly.
Test your brake lever — it should feel smooth, with firm, even pressure when fully pulled.
How To Install The Rear Brake
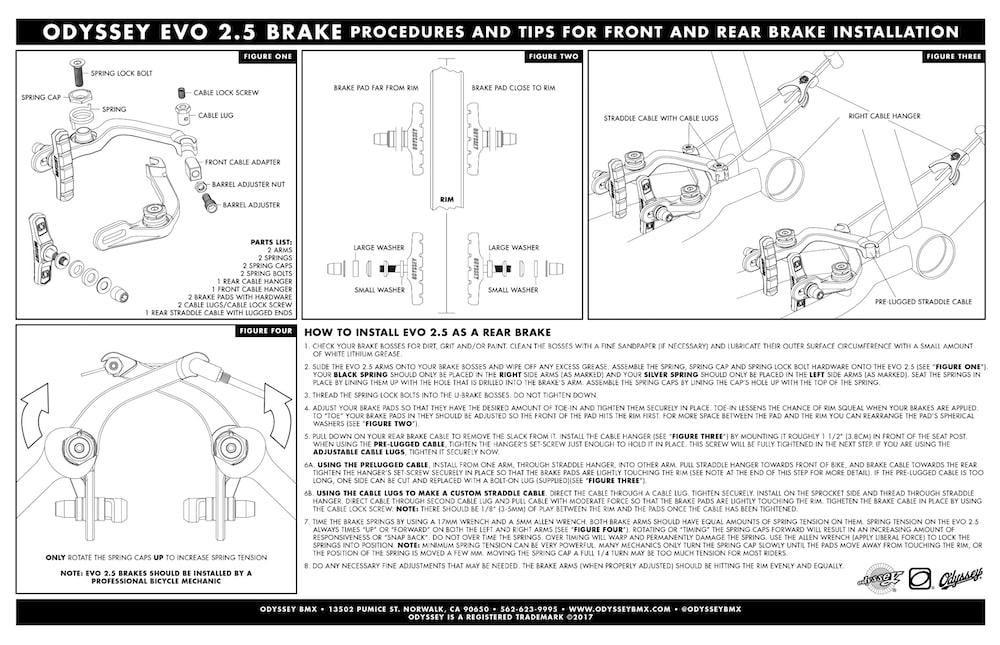
1. Prep and mount the arms
Clean and lightly grease your frame’s brake bosses.
Slide both brake arms onto the posts — again, black spring on the right, silver spring on the left.
Line up the springs with the frame holes and install the spring caps and lock bolts loosely.
2. Adjust and secure the pads
Align each brake pad so it sits flush on the rim with a slight toe-in.
Tighten the pad bolts securely.
3. Install the straddle cable
Pull down on the rear brake cable to remove slack.
Attach the rear cable hanger about 1.5” (3–4 cm) in front of the seatpost.
If you’re using the pre-lugged straddle cable, just connect both cable lugs to the brake arms and snug up the hanger bolt.
If using custom cable lugs, thread and tighten them evenly so both pads touch the rim at the same time.
4. Set cable tension
Tighten the cable lock screw until the pads are lightly touching the rim.
Pull the brake lever to test — you should feel solid contact without over-tightening.
5. Fine-tune the springs
Use an Allen key to adjust each spring cap so both arms pull back evenly when released.
Add a touch more tension if one side feels sluggish.
Final check: Pull your brake lever several times. Both pads should hit the rim evenly, release cleanly, and feel snappy.
Final Tip On Installation
Once everything feels balanced, add a drop of grease to all moving parts, check that your cable ends are crimped neatly, and give it a few test stops before hitting the streets or park.
The Odyssey Evo 2.5 is one of the easiest-to-tune and most reliable U-brakes out there — once it’s dialed, it stays that way.
GET YOUR ODYSSEY EVO BRAKE KIT NOW!Conclusion: Is The Odyssey Evo 2.5 Brake Kit Worth It?
Well, yes, it is.
The Evo 2.5 Brake Kit is a full performance upgrade that transforms how your bike feels under pressure.
You’re getting not just a caliper but an entire pro-level setup in one box.
The brake arms are forged for strength, the pads are pre-installed and ready to bite, and the Monolever? Smooth and responsive with every pull.
What sets it apart is the balance between power and precision.
It has the stopping muscle you need for fast park lines or steep street setups, but the feel is refined, so you can feather the brakes mid-line without throwing off your flow.
Abubacas and fufanus? This brake handles them with ease.
No more mixing and matching hardware or hoping your parts will play nice together.
This kit is plug-and-play, and once you’ve ridden it, you’ll wonder how you ever rode without it.
If you’re ready for more control, better stopping, and a brake kit that truly delivers – it’s time to make the switch.
GET YOUR ODYSSEY EVO BRAKE KIT NOW!My other Odyssey BMX part reviews:
- Odyssey Twisted Pro PC Pedals
- Odyssey MPEG Peg
- Odyssey Graduate PC Peg
- Odyssey Par Ends
- Odyssey Path Pro Tire
- Odyssey Bluebird Half Link Chain