
Is it really that important how you install a BMX half link chain?
Yes and no, depending on the chain you get.
When I received the first Shadow Conspiracy Interlock chain well over ten years ago, I triple-checked how to install it.
So, if you’re wondering if half link BMX chains are directional, they actually are.

However, not all of them.
For instance, Odyssey’s Bluebird half link chain works both ways, so there’s no right or wrong way to put it on.
But if you get the Shadow’s Interlock chain, do not you ride it “backwards.”
Note: You might also be interested in my collection of the best half link BMX chains.
This post covers:
- How To Install A BMX Bike Half Link Chain
- BMX Half Link Chain Maintenance Tips
- Conclusion: Master Half Link Chain Installation!
- FAQs About Installing A BMX Half Link Chain
How To Install A BMX Bike Half Link Chain

Let me walk you through the steps for properly installing the half link.
Step 0: Half Link Chain Direction
Before you start installing, check the direction of your half link chain.
Most half link chains are designed to run with the larger, “fatter” part of the link facing forward.
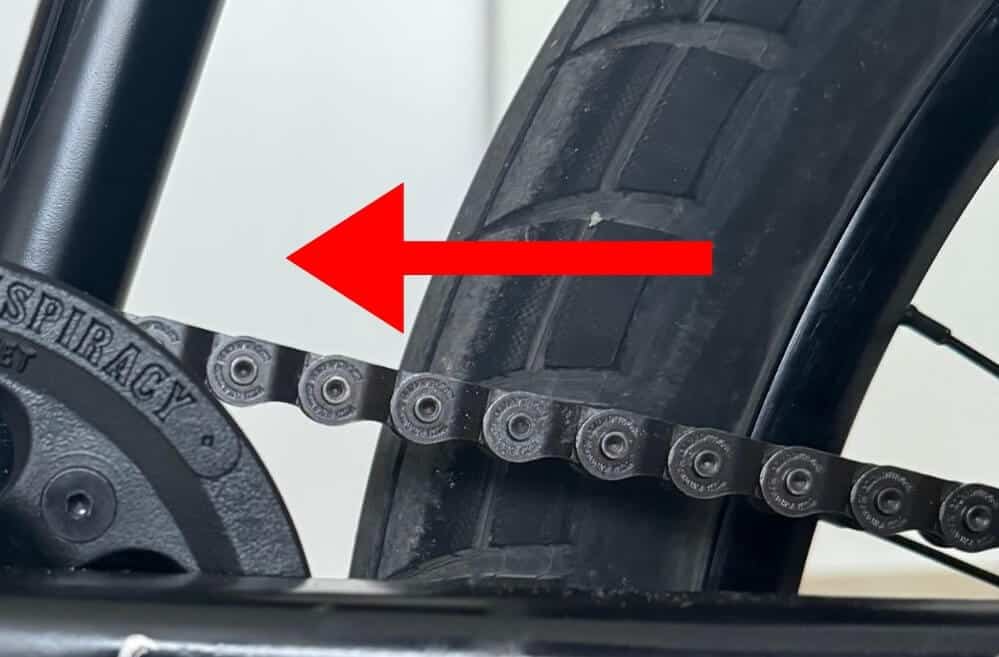
As mentioned earlier, you can ride some chains either way. But I always stick to the same principle.
This avoids questioning which way a half link chain goes. It’s always the same, larger part of the link goes foward – I do this even with chains like the Odyssey Bluebird, which is non-directional.
This helps the chain glide more smoothly over the sprocket and driver, reducing wear and avoiding tight spots.
Taking a moment to set the direction right at the start will save you frustration and keep your drivetrain running smoother for longer.
Step 1: Thread The Half Link Chain Through The Drivetrain
Start by guiding the chain through the rear wheel’s driver (or cog), then over the front sprocket.
This will allow you to find the perfect length of your half link chain.

Remember (!): To be safe and sound, always install your half link with the larger part of the plate facing forward.
I recommend you do this even with chains that you can ride “backwards.”
Step 2: Connecting The Ends Of The Half Link Chain

Now that you have the right chain length, it’s time to connect the ends.
How To Use A Chain Breaker:
If you’ve never used a BMX chain breaker before, no worries—it’s a handy little tool that’s easy to master.
Note: Classic road bike chain breaker tools won’t work with BMX half link chains because the plates are too thick and don’t fit the tool. Ideally, get a BMX-specific tool, like the Shadow’s Pro Grade chain breaker.
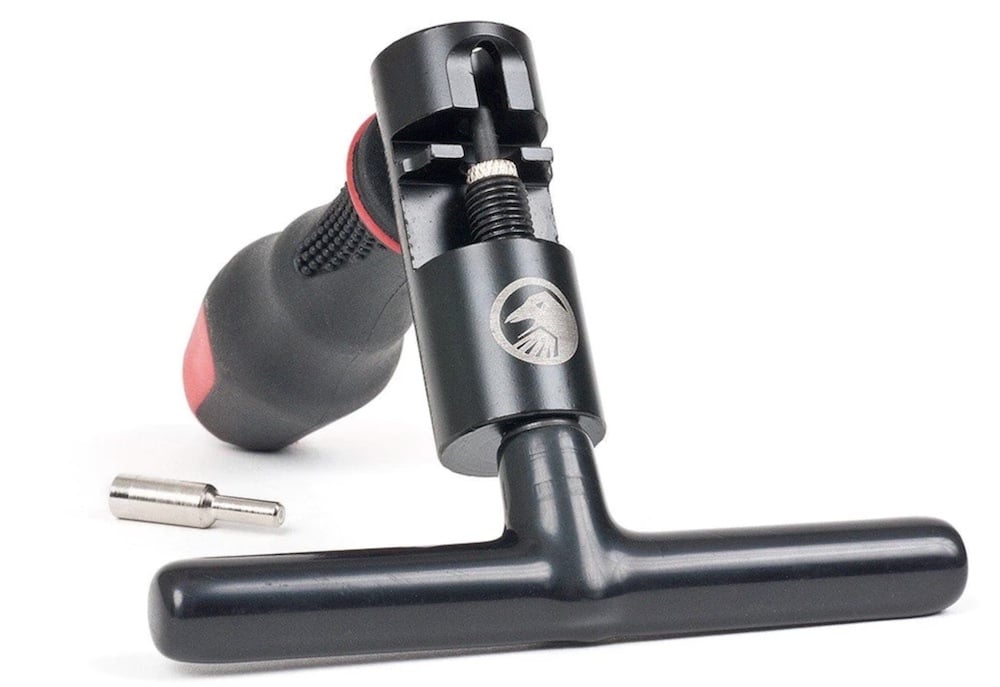
Insert the end of the chain into the chain breaker’s slot.
You’ll want to line up a pin from the chain with the pin on the chain breaker.
Gently turn the handle to push the pin out just enough to connect the ends of the chain.
Remember, we’re not removing the pin completely – just pushing it far enough to unite the two ends.
I leave it in for 1-2 mm so it connects with the other side of the chain more easily.
If you push it through completely, don’t worry, you can put it back in, it just makes things a little harder.
Tips For Ensuring The Pins Are Aligned:
- Take it slow: Rushing might cause the pin to bend or break, so patience is key. On the other hand, you can also bend the link on the other side if it’s not aligned.
- Double-check alignment: Ensure the chain and tool pin are perfectly aligned before applying pressure.
- Apply even pressure: Turn the handle consistently to avoid misalignment.
Pro tip: Always use the master pin when assembling and disassembling the chain. It should go through relatively easily.
However, if your chain is rusty (like mine was recently), the master pin might require some additional force to get it out.
And if you’ll be using this same rusty chain again – oil it properly first!
Step 3: Checking For Correct Half Link Chain Tension

With your chain now connected, we’re on the home stretch.
It’s time to check the tension. A well-tensioned chain is crucial for a smooth ride and optimum performance.
Further reading: BMX Chain Tension Explained
Adjusting Tension For Optimal Performance:
- Feel the tension: Gently push and pull the chain at the midpoint between the sprocket and the driver. You’re looking for a bit of give but not too loose. You’re aiming for about half an inch of movement up and down.
- Adjust as needed: If the chain feels too tight or too loose (do you want to do crankflips?), adjust the rear wheel’s position in the dropouts. Moving the wheel back adds tension (built-in chain tensioners make this super easy); moving it forward loosens it.
Remember to tighten everything securely once you’ve found that sweet spot.
BMX Half Link Chain Maintenance Tips

A well-maintained chain means smoother rides, fewer repairs, and more fun.
- Keep it clean: After those sessions, your chain can get a bit grimy. Use a gentle degreaser and a soft brush to clean off the dirt and old lubricant. Rinse with water and dry thoroughly to avoid rust. (But more often than not, using a dry cloth will do the trick.)
- Lubricate wisely: A well-lubricated chain is a happy chain. Apply a quality chain lubricant evenly, turning the pedals to ensure it works into every link. Wipe away excess to avoid attracting more dirt.
- Check for wear: Give your chain a quick visual inspection every now and then. Look for signs of wear, such as stretched links or damaged pins. This can save you from unexpected breaks during a ride.
Further reading: Is WD-40 A Good BMX Chain Lubricant?
Regular Half Link Chain Maintenance Tips
- Make it a routine: Incorporate chain maintenance into your regular BMX bike care routine. A quick clean and lube every few rides keep your chain in prime condition and your rides smooth.
- Listen up: Pay attention to the sounds your bike makes. Squeaking or grinding noises often hint that it’s time for some chain love.
- Stay aligned: Ensure your chain and sprockets are properly aligned. Misalignment can cause uneven wear and tear, shortening your chain’s (and sprocket’s!) lifespan.
When To Consider Replacing Your Half Link Chain
- Measure up: Chains stretch over time. Use a chain checker tool or ruler to measure. If your chain has stretched beyond the manufacturer’s recommendation, it’s time for a new one.
- Watch for consistent issues: If you’re regularly encountering issues like slipping or poor performance, your chain might tell you it’s ready to retire even after maintenance.
- Upgrade time: Sometimes, you just want to upgrade your ride. A new chain can be a simple but effective way to enhance your BMX’s performance.
Further reading:
Remember, taking care of your chain is taking care of your ride.
A little bit of regular maintenance not only extends the life of your chain but also ensures your BMX is always ready for your sessions.
Conclusion: Master Half Link Chain Installation!
That’s all you need to know about installing your new half link chain.
As mentioned earlier, I don’t recommend riding half links “backwards.”
Ensure you install it so the larger part of the plate faces forward.
Note: I do this even with those half link chains that you can ride either way. It just looks better this way.
This ensures the chain provides you with all the strength you deserve.
FAQs About Installing A BMX Half Link Chain
What is a half link chain?
A half link chain is a BMX chain with individual links that are half the length of a standard full link, allowing for more precise chain and chainstay length adjustment and easier wheel positioning in the dropouts.
Do I need any special tools to install a BMX half link chain?
Yes, you need a chain breaker, essential for adjusting the chain’s length and connecting the links properly. Remember that a classic, road bike chain breaker likely won’t work with a half link because the plates are thicker.
How do I know if the chain is the right length for my BMX?
The right chain length ensures proper tension and drivetrain efficiency. After threading the chain through the drivetrain, there should be about half an inch of movement up and down at the midpoint between the sprocket and the driver. Adjust as necessary by removing or adding links before connecting the ends.
Can I reuse my old master link with a new half link chain?
Yes, but I recommend using your old master link only if you have the same model chain. However, every new half link chain comes with a brand new master link, so use that one.
How often should I replace my BMX half link chain?
A chain’s lifespan can vary depending on how often you ride and under what conditions. Regular maintenance can extend its life. However, if you notice significant wear, such as stretched links, or if the chain consistently performs poorly (e.g., slipping), it’s time for a replacement.
What is a half link chain master link?
A half link chain master link is a special connecting link that lets you easily join or remove a half link chain.


