Many asked me to explain the BMX frame geometry, so I decided to write this in-depth overview to make things clear for everyone.
I didn’t care much about the frame geo and specs when I started riding BMX. I didn’t even know what top tube length I had on my first bike!
But when I got more into BMX, I started to see things like CS, standover, BB height, etc.
Over the years, I went from not caring about frame specs to being really picky about it.
Why?
Because when you progress, (almost) all those angles and lengths matter and can help you make riding your bike more comfortable (and progress faster), depending on your style.
In other words, there’s a specific frame geo for street, for riding fast, for flatland, for park, etc.
However, in plain English, you sometimes want a more stable and sometimes a more responsive frame.
This post covers:
But there are also all-around frames for riders who enjoy shredding a little bit of everything. (Although I haven’t really seen a flat and trails combo frame, but there are many frames that are perfect for flat and street riding.)
Let’s DIG deeper!
The Importance Of BMX Frame Geometry

Here’s a quick overview so you know exactly what’s what.
| Geometry term | Explanation |
| Top tube length | Determines the overall size of the frame, affecting comfort & fit based on rider height & style. |
| Head tube angle | Affects bike handling: steeper angles make it more responsive, while mellower angles provide stability. |
| Head tube height | Influences front-end height & allows the rider to use fewer spacers for a cleaner look. |
| Chainstay length | Shorter lengths enhance responsiveness & ease for tricks, while longer lengths offer stability for fast riding. |
| Standover height | Refers to the height of the seat tube from the center of the bottom bracket, mainly influencing bike aesthetics & some tricks like barspins or tailwhips. |
| Seat tube angle | Impacts the effective top tube length; a steeper angle makes the bike feel shorter, while a slacker angle feels longer. |
| Bottom bracket height | Affects the bike’s center of gravity, with higher heights making it more responsive & lower heights offering more stability. |
Don’t worry if these BMX terms are new to you.
You’ll quickly get used to them because we all eventually start to check them more and more, so they literally become engrained in us.
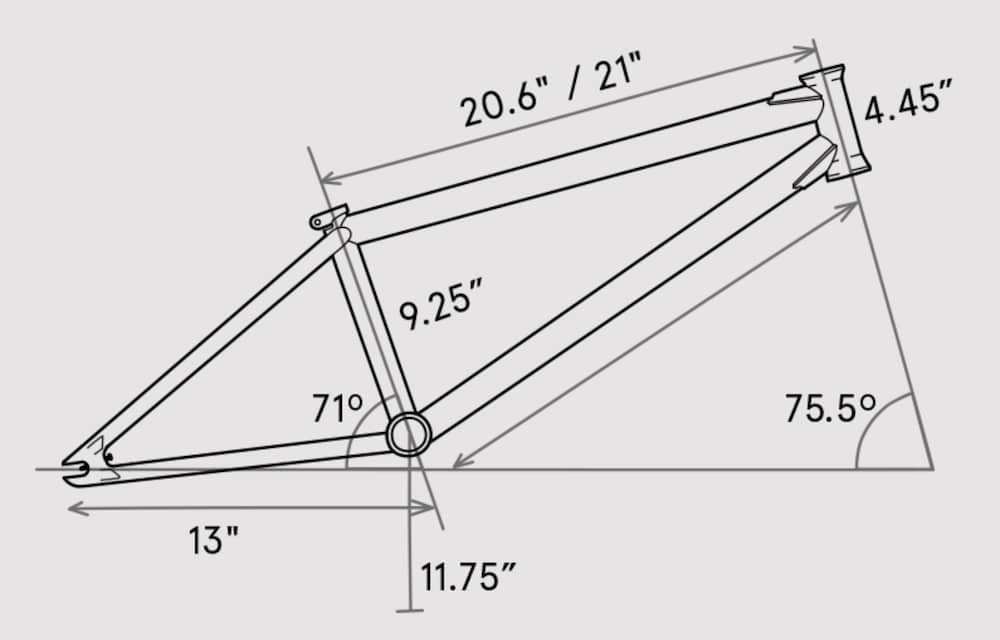
Frame geometry (example):
- Top tube length: 20.6″, 21″
- Head tube angle: 75.5º
- Head tube height: 4.45″
- Chainstay length: 13″
- Standover height: 9.25″
- Seat tube angle: 71º
- Bottom bracket height: 11.75″
Top Tube Length
The first thing that everyone checks is the top tube (TT) length. Why is it so important?
Because it’s the main element of the size of your frame.
The top tube length measures from the center of the head tube to the center of the seat tube.
Some of the more standard lengths are 20.5″, 20.75″, 21″ and 21.25″.
Of course, there are also shorter and larger versions (I ride a 21.6″ frame) so that every rider can find the perfect fit for his height and riding style.
What’s interesting is that, although there are many frame size charts out there, when you compare them to the TTs pro riders ride, they usually all opt for a longer version.
I decided to test this approach, too, and I must say that my bike feels much better.
But here’s a more general look at which frame size would work best for you:
| Rider height | Top tube length |
| 4’8″ to 5’2″ | 18.5″ – 20″ |
| 5′ to 5’4″ | 20″ |
| 5’2″ to 5’6″ | 20.25″ |
| 5’4″ to 5’8″ | 20.5″ |
| 5’6″ to 6′ | 20.75″ |
| 5’8″ to 6’2″ | 21″ |
| 6’+ | 21.25″ |
But feel free to go through my article on BMX top tube length to learn even more and pick the right frame size.
Head Tube Angle
Besides TT, the head tube (HT) angle is also one of the most talked-about BMX frame geometry.
The reason is, a mellower angle makes your bike feel more stable and a steeper angle more responsive.
That’s why you’ll see riders who go fast and prefer riding transitions with at least 75-degree HT, but usually, they’ll opt for a 74.5-degree frame.
On the contrary, street riders tend to prefer frames with a 75.5-degree HT angle (there are even frames available with 76-degree HT, which is really steep!).
Yes, that small change in the angle can mean a big difference.
But I recommend every beginner picks a frame with a 75-degree head tube angle. It’s a great starting point that suits any riding style.
But for everyone else, here’s what works best:
- Street: 75.5 – 76 degrees (see best BMX street frames)
- Park: 75 – 75.5 degrees (see best BMX park frames)
- Trails: 74 – 75 degrees (see best BMX trails frames)
- Flatland: 75 – 75.5 degrees (see best BMX flatland frames)
You can also control the responsiveness and stability of your frame with the length of your stem, fork offset and positioning your bar in line with your fork or more Chicago.
Still, if you want to learn more, check out why frame heat tube angle matters.
Head Tube Height
The head tube height is something that hasn’t been really talked much about until recently.
More and more riders started to prefer raising their front ends (me included!) because of how much better the bike handles. (And no, a high front-end won’t necessarily lower your bunnyhop; in fact, it can make you hop higher.)
Besides going with a higher bar and a top load stem, using spacers is another way to make your front-end taller.
But, in general, riders don’t prefer to use too many spacers because of the looks.
That’s why BMX brands decided to start putting longer head tubes to eliminate the need for (using too many) spacers, so riders can enjoy a cleaner bike look.
Thus, the newer frames usually have a 5″ head tube length, while more traditional frames had anything below the 5″ mark (usually around 4.6″).
Chainstay/Rear End Length
If the previous BMX frame geo isn’t something riders really talk about, chainstay (CS) length is!
It’s something that, in my opinion, has the biggest impact on how your bike feels.
A short CS will make your bike really responsive, easier to spin, easier to manual (but also easy to loop out if you’re not used to it), easier to bunnyhop and also easier to tailwhip.
On the contrary, a long CS will be much more stable, which is ideal for someone who likes to ride fast, goes high and, generally, prefers flow over anything else.
Luckily, no frame has a single chainstay length – but is normally optimized for at least two.
How can you adjust the CS length?
Thanks to dropouts, you can slam or stretch out the wheel to test what feels best for you.
When it comes to chainstays, you’ll see the term “slammed” mentioned more often than not. It means the length when you push your wheel all the way to the frame, so the hub axle touches the frame.
Chainstays can go from 12.4″ to 14″+, but a mid-length (13-13.5″) is something I’d say a beginner should start with.
Still, I get more in-detail on the topic of CS in my article on choosing the best BMX chainstay length.
Standover Height
From what I noticed when talking to other riders, no one really bothers about what standover height their frame has.
But I think it’s SO important.
Not so much because it would change how your bike handles (because it doesn’t do too much), but it’s because of the looks.
The standover height is the measurement of the seat tube that connects the frame’s top tube and the bottom bracket (BB) – you measure it from the BB’s center to the TT’s center.
The BMX market has many options available, from around 6.5″ and up to 10″.
One of the reasons for going with a low standover height is that riders say it makes tailwhips easier.
But I need to mention that this really applies to dudes who are pulling two or more whips. If you’re a single-whip dude, the standover height won’t make that much difference.
On the other side, a higher standover means it’ll make pinching the seat easier, which consequently makes barspins easier.
Remember, you can do both tricks with either a low or a high standover. So when trying to figure out which is better – they are more or less a personal preference.
For me: High standover FTW!
Check out all about standover height in my tutorial, where I also show you two frames with completely different standovers so that you can see the difference.
Seat Tube Angle
Similar to the head tube height, no one really bothers too much about the seat tube (ST) angle.
Because of one simple reason: It doesn’t really impact (too much) how your bike feels.
And most of the modern frames come with a 71-degree ST angle anyway.
Anyway, why do some frames have a 69-degree and why some 71-degree ST angle (note that there are other versions, too)?
- A 69-degree ST angle will make your frame feel longer.
- A 71-degree ST angle would make it feel shorter.
But you need to know that the feel of the longer/shorter frame is also impacted by the standover height.
In other words, a frame with a 69-degree and a 7″ standover and a frame with 69-degree and a 10″ will have a slight difference in the TT length (even though both might have, for example, a 21″ TT.)
I suggest you read more on the topic of seat tube angle and if it really matters in one of my articles.
Bottom Bracket Height
Do all these frame geometry specs feel a bit overwhelming to you?
Stick with me, we only have one more to cover, and we’re done!
HURRAY.
Bottom bracket (BB) height is the vertical distance from the ground to the center of the bottom bracket shell.
You can find frames with an 11.5″ BB height and all the way up to 12″.
- Lower BB height: Keeps the center of gravity lower, adding more stability that is handy when riding fast.
- Higher BB height: Raises the center of gravity, making the bike feel more responsive and twitchy (better for spinning, but it also works excellent for crooked grinds because it gives more clearance, so you’ll be less likely to hit the chainstays).
If you’re unsure about the best-fitting BB height, go with 11.7″ because it’s the most all-around.
But if you need more information, go check my guide on bottom bracket height and why it matters.
And if you need a new BB, I have a list of the best BMX bottom brackets ready for you.
Bonus: BMX Frame Material
In BMX, you will primarily see frames made from 4130 CrMo (Chromoly) and Hi-Tensile steel.
Hi-Tensile is usually used in (lower-priced) complete bikes because it’s cheaper but decent enough for a beginner.
Chromoly (with heat treatment) is used for all high-quality frames and complete bikes because it’s extremely strong and durable.
It’s something I recommend everyone to opt for, including a beginner (who has a vision of riding the bike (and using it for tricks) a lot).
Sure, there are also Titanium frames, but those are extremely rare and extremely expensive.
And if someone tries to sell you an Aluminium BMX – Don’t!
Conclusion: What BMX Frame Geometry Specs Matter?
If you want to geek around frames, that’s great! You’d probably be analyzing every geo and every spec, just like myself.
However, most of the riders don’t, and that’s perfectly fine.
But the majority still check the top tube length, the chainstay length and the head tube angle.
These are the three most important frame geos you should worry about. All the rest aren’t as essential, but still worth being familiar with.
Now you know everything about the BMX frame geometry.
If you still need any additional information and help picking the right frame, hit me on Instagram or via the contact form on The BMX Dude.


